Screenshots
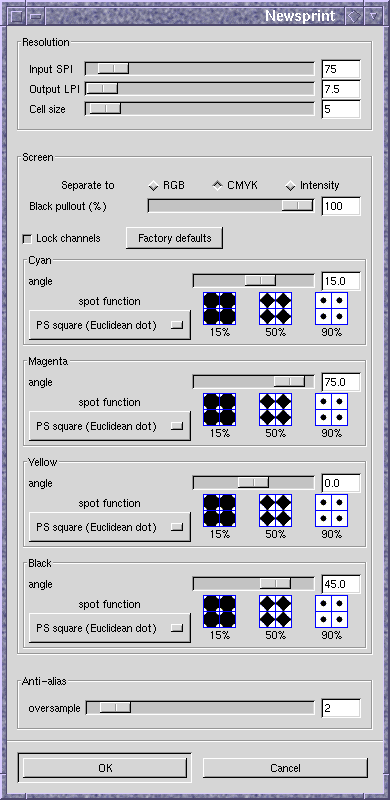 Ok, so the dialog box is too big and it's way ugly, but it does allow
full control over all the parameters to the screening algorithm.
The resolution area at the top sets how large the cells are to be.
Next is the screen control area. You can select whether to separate
to RGB, CMYK or by intensity (i.e. greyscale). Depending on your
choice, there will then be the channel controls, one for each
independent colour channel (ie, 1 in greyscale or intensity mode, 3 in
RGB, and 4 in CMYK).
Each channel has its own spot function and screen angle specified.
Finally, the anti-alias section controls how much oversampling to do,
if any. There's little point doing any anti-aliasing for pre-press
uses, but since I anticipate the major use will be for special
effects, anti-aliasing helps give nice clean edges to the spots.
The spot previews in blue boxes update as you select different spot
functions. There is no overall image preview, since if it were at a
reduced resolution, nasty aliasing artefacts would appear. A preview
at the full resolution would take too long to render.
Why not look at the gallery to see some
images that have been manipulated or created with this plug-in?
Ok, so the dialog box is too big and it's way ugly, but it does allow
full control over all the parameters to the screening algorithm.
The resolution area at the top sets how large the cells are to be.
Next is the screen control area. You can select whether to separate
to RGB, CMYK or by intensity (i.e. greyscale). Depending on your
choice, there will then be the channel controls, one for each
independent colour channel (ie, 1 in greyscale or intensity mode, 3 in
RGB, and 4 in CMYK).
Each channel has its own spot function and screen angle specified.
Finally, the anti-alias section controls how much oversampling to do,
if any. There's little point doing any anti-aliasing for pre-press
uses, but since I anticipate the major use will be for special
effects, anti-aliasing helps give nice clean edges to the spots.
The spot previews in blue boxes update as you select different spot
functions. There is no overall image preview, since if it were at a
reduced resolution, nasty aliasing artefacts would appear. A preview
at the full resolution would take too long to render.
Why not look at the gallery to see some
images that have been manipulated or created with this plug-in?
(c) 1998 Austin Donnelly <Austin_Donnelly@yahoo.co.uk>
$Id: screenshots.html,v 1.4 2001/05/25 12:27:24 and1000 Exp $